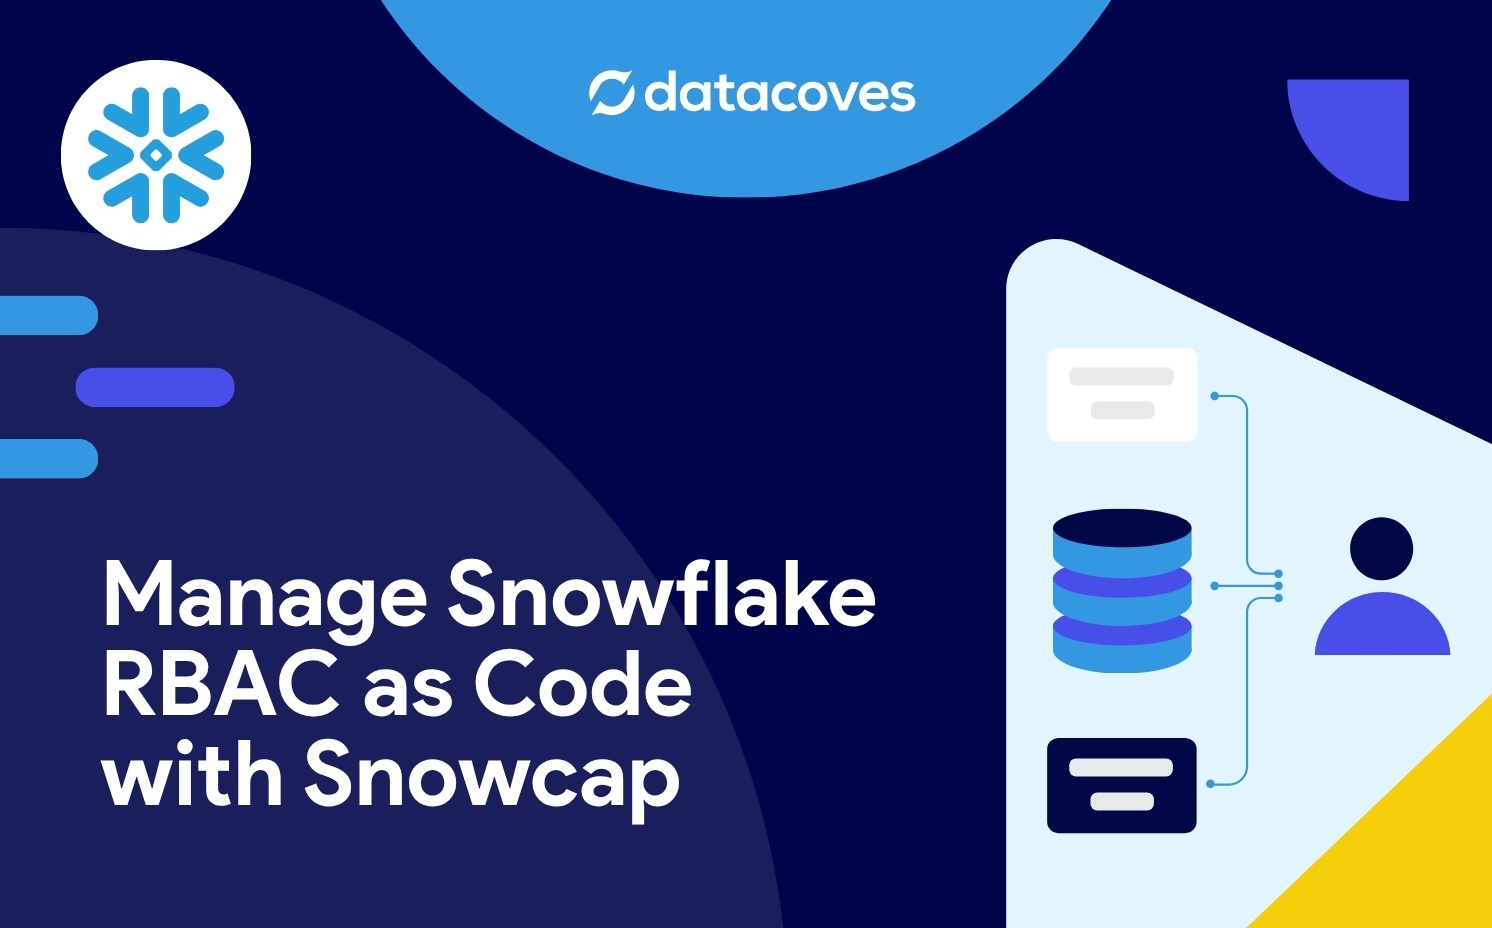
- Managing Snowflake RBAC as code means declaring roles, grants, and user assignments in YAML instead of clicking through the Snowflake UI, so every permission change is reviewed in a pull request and recorded in Git.
- The recommended pattern is a four-layer hierarchy: object roles hold privileges on individual objects, composite roles bundle them, functional roles get assigned to users, and users inherit everything through the chain. Never grant privileges directly to a user.
- Grant on
allandfutureschemas, tables, and views. Without the future grants, every object created tomorrow needs a manual grant, which is how drift starts. - Snowcap uses whichever of your user’s roles each operation requires, so the deployment user needs privileges covering every resource type in the config. For anything past a sandbox, use a dedicated service account rather than a built-in admin role.
- Run
snowcap planbefore everysnowcap apply. A wrong grant is a security problem, not just a cost problem. - Once the pattern is in place, onboarding is one line, offboarding is one deletion, and a new database is one object role that every existing functional role picks up automatically.
To manage Snowflake RBAC as code with Snowcap, you declare a role hierarchy in YAML instead of clicking through grants one at a time. Object roles hold privileges on individual objects, composite roles bundle those together, and functional roles get assigned to users. You run snowcap plan to preview every grant, then snowcap apply to deploy it, and the whole configuration lives in Git with a commit for every change.
This post builds that chain end to end: a working analyst role wired through four object roles, one composite role, a functional role, and a user assignment, all from a single YAML file. If you’d rather watch than read, the companion video below covers the same ground.
Get our free ebook dbt Cloud vs dbt Core
Comparing dbt Core and dbt Cloud? Download our eBook for insights on feature, pricing and total cost. Find the best fit for your business!
Get the PDF
New to Snowcap? Start with Introducing Snowcap: Snowflake Infrastructure as Code, Done Right, then How to Install Snowcap and Create Your First Snowflake Warehouse. This post picks up where that one left off: the same plan and apply loop, one level up from a warehouse to permissions.
Why Manage Snowflake RBAC as Code?
Managing Snowflake RBAC as code gives you one source of truth for who can access what, versioned in Git and reviewed before anything reaches production. Clicking through grants in the Snowflake UI is fine on a fresh account. Give it a year, and most accounts drift into the same tangle: someone granted access “just for one query” and never revoked it, a service account picked up a role nobody fully understood, and now no one can say with confidence who can read which tables.
Managing permissions by hand breaks down in three specific places.
Drift. Once a grant exists, it’s part of your account state. Nothing records what should be there versus what happens to be there, so grants accumulate and nobody removes them, because nobody knows which ones are safe to remove.
No audit trail. A grant gets created, but the UI won’t tell you who created it, when, or why. That turns into a real problem the day compliance asks you to prove who has access to PII.
Slow, risky changes. Onboarding an analyst means hunting through the UI to copy whatever roles their teammate happens to have. Offboarding means hoping you remembered to revoke everything. Standing up a dev or staging environment means rebuilding all of it from scratch.
Snowcap moves the source of truth into your repo. Roles, grants, and user assignments are declared in YAML, versioned in Git, and reviewed in pull requests. Every change is a commit, so the audit trail exists by default. And because Snowcap queries the live account on every run, drift shows up the moment it happens instead of months later.
The Pattern: A Role Hierarchy Instead of Direct Grants
The core rule is simple: never grant privileges directly to users. Grant them to roles, then stack the roles into a hierarchy. When someone leaves or changes teams, you adjust their roles instead of untangling a pile of individual grants. This is also what Snowflake itself recommends, since granting privileges directly to users tends to multiply grants across an account.
Never grant privileges directly to users. Grant them to roles, then stack the roles into a hierarchy.
The hierarchy has four layers, from the bottom up.
Object roles sit at the base. One role per Snowflake object: one per database, one per warehouse, one per schema. Each grants exactly the privileges needed on that single object and nothing more. By convention these get a z_ prefix (z_db__analytics, z_wh__wh_transforming) so they sort to the bottom of role lists in the UI and stay out of the way of the roles you actually assign. The prefix itself is arbitrary. What matters is that object roles are visually separable from the roles people actually get assigned, so pick a convention and hold to it.
Composite roles, also called base roles, bundle object roles into logical groups. z_base__analyst might combine database access, schema usage, and warehouse access into a single unit that represents everything an analyst needs at the object level.
Functional roles are the human-readable ones: analyst, loader, transformer_dbt. These are what you grant to people. A functional role usually points at one composite role, sometimes with a few extra grants layered on top.
Users sit at the top. Each user gets one or more functional roles, and inherits everything underneath through the chain.
Reading the chain top to bottom: a user has the analyst role, which contains z_base__analyst, which contains four object roles, each of which grants privileges on one real Snowflake object.
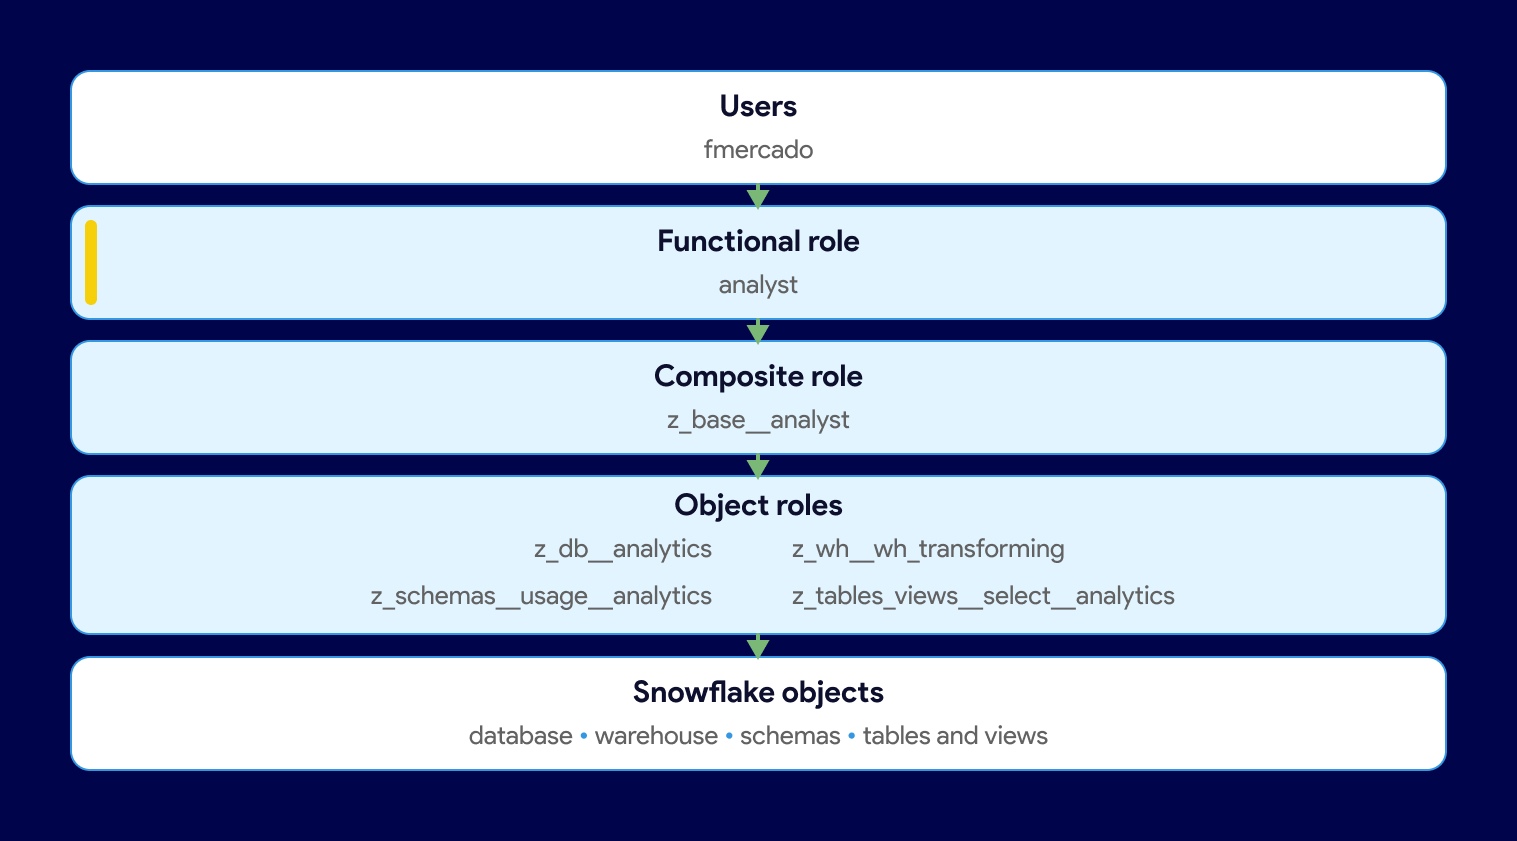
The payoff is what this structure does when things change. Add a new database, and you create one object role for it and plug that role into the composite roles that should see it. The functional roles don’t change. The user assignments don’t change. That containment is the whole point, and it’s why the pattern holds up as an account grows from three databases to thirty. If you want the underlying mechanics, Snowflake’s access control model covers how privileges inherit up a role hierarchy.
Set it up this way from the start. The layering looks like overhead when you have one role, but it’s a few extra lines now against a rewrite later, and it scales as you grow without you having to revisit the decision. A flat set of roles feels simpler on day one and turns into the exact drift this pattern prevents.
The hierarchy is a Snowflake pattern, not a Snowcap one. You could build it by hand in SQL. What a declarative tool changes is whether you can still maintain it in a year.
Which Snowflake Role Does Snowcap Need?
Snowcap needs a user whose roles cover everything in your config. SNOWFLAKE_ROLE sets the primary role for the session, but Snowcap runs USE SECONDARY ROLES ALL, so every role granted to that user is active and Snowcap uses whichever one each operation requires. Creating a role, for example, lands under USERADMIN regardless of what you set in .env.
That matters because different resource types need different privileges:
A config that declares a warehouse and the roles that use it needs both SYSADMIN and SECURITYADMIN capabilities. No single built-in role covers it, which is why the Snowcap docs recommend a dedicated service account with exactly the privileges your config requires.
This walkthrough only creates roles, grants, and role grants, so a user holding SECURITYADMIN is enough. The previous post used SYSADMIN because it created a warehouse. Set it in your .env alongside the rest of your credentials:
SNOWFLAKE_ACCOUNT=my-account
SNOWFLAKE_USER=my-user
SNOWFLAKE_ROLE=SECURITYADMIN
SNOWFLAKE_PRIVATE_KEY_PATH=/path/to/rsa_key.p8
SNOWFLAKE_AUTHENTICATOR=SNOWFLAKE_JWT
Before you point Snowcap at anything beyond a sandbox, set up the dedicated role instead.
One thing worth flagging, since it comes up constantly: Snowflake’s own documentation suggests granting all custom roles to SYSADMIN so administrators can reach every object. We don’t recommend it. It hands SYSADMIN access to data it has no business reading, blurs the line between managing infrastructure and consuming data, and makes auditing harder right when you need it most. Keep SYSADMIN on infrastructure, use functional roles for data access, and grant admins a functional role explicitly if they genuinely need the data.
Build the Role Hierarchy in YAML
Everything below goes into a single snowcap.yml. That’s for readability while you follow along. A real project should split this across several files, which we’ll get to right after the config runs.
We’re building the analyst role: access to the analytics database, the wh_transforming warehouse, every schema in that database, and SELECT on the tables and views inside it. Four object roles, one composite role, one functional role, one user.
This assumes an analytics database and a wh_transforming warehouse already exist in your account. If you’re following from the previous post, substitute whatever names you created. Substitute your own Snowflake username in the to_user line too, since Snowcap grants roles to existing users rather than creating them here.
Each block below adds to the same snowcap.yml. Where you see roles: or grants: again, those entries go into the existing list rather than starting a new key. The complete file appears at the end of this section.
Object Roles
Start at the bottom. Two roles to begin with, one wrapping the database and one wrapping the warehouse:
# snowcap.yml
roles:
  - name: z_db__analytics
  - name: z_wh__wh_transforming
Then the grants that give them meaning:
grants:
  - priv: USAGE
    on: database analytics
    to: z_db__analytics

  - priv:
      - USAGE
      - MONITOR
    on: warehouse wh_transforming
    to: z_wh__wh_transforming
USAGE on the database lets a role see that the database exists and reference it. It does not grant access to any data inside. On the warehouse, USAGE lets the role run queries and MONITOR lets it see what’s running.
Two roles, two grants, each wrapping exactly one Snowflake object. These are deliberately boring. They’re building blocks.
Now the two that actually reach the data. Snowflake’s permission model requires USAGE at each level, database and then schema, before anyone can query a table:
roles:
  # ... existing entries above
  - name: z_schemas__usage__analytics
  - name: z_tables_views__select__analytics

grants:
  # ... existing entries above
  - priv: USAGE
    on:
      - all schemas in database analytics
      - future schemas in database analytics
    to: z_schemas__usage__analytics

  - priv: SELECT
    on:
      - all tables in database analytics
      - all views in database analytics
      - future tables in database analytics
      - future views in database analytics
    to: z_tables_views__select__analytics
The future grants are the important part. Without them, every new schema or table someone creates tomorrow needs a manual grant, which is exactly how drift starts. With them, new objects are covered the moment they exist.
Grant on both current and future objects. Without future grants, every schema or table someone creates tomorrow needs a manual grant, which is exactly how permission drift begins.
The Composite Role
Bundle the four object roles into one:
roles:
  # ... existing entries above
  - name: z_base__analyst

role_grants:
  - to_role: z_base__analyst
    roles:
      - z_db__analytics
      - z_wh__wh_transforming
      - z_schemas__usage__analytics
      - z_tables_views__select__analytics
Everything an analyst needs at the object level now lives in a single role. When you add a second database later, it plugs in here.
The Functional Role
roles:
  # ... existing entries above
  - name: analyst

role_grants:
  # ... existing entries above
  - to_role: analyst
    roles:
      - z_base__analyst
This layer looks like overhead when there’s only one functional role, and it is. It earns its place the moment you add a senior_analyst or a read_only_analyst that share the same base and differ by a grant or two.
Assign the Role to a User
Same role_grants block, but to_user instead of to_role:
role_grants:
  # ... existing entries above
  - to_user: fmercado
    roles:
      - analyst
That’s the full chain: a user holds a functional role, which holds a composite role, which holds four object roles, each granting privileges on one real Snowflake object. Assembled, the file looks like this:
# snowcap.yml

# Object roles: one per Snowflake object
roles:
  - name: z_db__analytics
  - name: z_wh__wh_transforming
  - name: z_schemas__usage__analytics
  - name: z_tables_views__select__analytics

# Base/composite role
  - name: z_base__analyst

# Functional role
  - name: analyst

grants:
  - priv: USAGE
    on: database analytics
    to: z_db__analytics

  - priv:
      - USAGE
      - MONITOR
    on: warehouse wh_transforming
    to: z_wh__wh_transforming

  - priv: USAGE
    on:
      - all schemas in database analytics
      - future schemas in database analytics
    to: z_schemas__usage__analytics

  - priv: SELECT
    on:
      - all tables in database analytics
      - all views in database analytics
      - future tables in database analytics
      - future views in database analytics
    to: z_tables_views__select__analytics

# Role hierarchy
role_grants:
  - to_role: z_base__analyst
    roles:
      - z_db__analytics
      - z_wh__wh_transforming
      - z_schemas__usage__analytics
      - z_tables_views__select__analytics

  - to_role: analyst
    roles:
      - z_base__analyst

  - to_user: fmercado
    roles:
      - analyst
Six roles, four grant blocks, three role grant blocks. No SQL.
Plan, Apply, and Verify
Same loop as the warehouse post. Plan first.
The commands below are written as snowcap plan and snowcap apply, which assumes you installed Snowcap with pip into a virtual environment. If you’re running it through uv, prefix each command with uvx: uvx snowcap plan, uvx snowcap apply. Everything else is identical.
snowcap plan --config snowcap.yml
Snowcap connects, runs its introspection queries against the account (SHOW GRANTS ON ACCOUNT, SHOW ROLES IN ACCOUNT, SHOW DATABASES IN ACCOUNT, and others), compares what it finds to your config, and prints exactly what it would do:
» snowcap
» Plan: 21 to create, 0 to update, 0 to transfer, 0 to drop.

━━━ ROLES ━━━━━━━━━━━━━━━━━━━━━━━━━━━━━━━━━━━━━━━━━━━━━━━━━━━━━━━━━━━━
+ CREATE: Z_WH__WH_TRANSFORMING (owner: USERADMIN)
+ CREATE: ANALYST (owner: USERADMIN)
+ CREATE: Z_SCHEMAS__USAGE__ANALYTICS (owner: USERADMIN)
+ CREATE: Z_DB__ANALYTICS (owner: USERADMIN)
+ CREATE: Z_TABLES_VIEWS__SELECT__ANALYTICS (owner: USERADMIN)
+ CREATE: Z_BASE__ANALYST (owner: USERADMIN)

━━━ GRANTS ━━━━━━━━━━━━━━━━━━━━━━━━━━━━━━━━━━━━━━━━━━━━━━━━━━━━━━━━━━━
+ CREATE: SELECT on ALL TABLES in DATABASE.ANALYTICS → ROLE.Z_TABLES_VIEWS__SELECT__ANALYTICS
+ CREATE: SELECT on ALL VIEWS in DATABASE.ANALYTICS → ROLE.Z_TABLES_VIEWS__SELECT__ANALYTICS
+ CREATE: SELECT on FUTURE VIEWS in DATABASE.ANALYTICS → ROLE.Z_TABLES_VIEWS__SELECT__ANALYTICS
+ CREATE: USAGE on ALL SCHEMAS in DATABASE.ANALYTICS → ROLE.Z_SCHEMAS__USAGE__ANALYTICS
+ CREATE: SELECT on FUTURE TABLES in DATABASE.ANALYTICS → ROLE.Z_TABLES_VIEWS__SELECT__ANALYTICS
+ CREATE: MONITOR on WAREHOUSE.WH_TRANSFORMING → ROLE.Z_WH__WH_TRANSFORMING
+ CREATE: USAGE on DATABASE.ANALYTICS → ROLE.Z_DB__ANALYTICS
+ CREATE: USAGE on WAREHOUSE.WH_TRANSFORMING → ROLE.Z_WH__WH_TRANSFORMING
+ CREATE: USAGE on FUTURE SCHEMAS in DATABASE.ANALYTICS → ROLE.Z_SCHEMAS__USAGE__ANALYTICS

━━━ ROLE_GRANTS ━━━━━━━━━━━━━━━━━━━━━━━━━━━━━━━━━━━━━━━━━━━━━━━━━━━━━━
+ CREATE: ROLE.Z_DB__ANALYTICS → ROLE.Z_BASE__ANALYST
+ CREATE: ROLE.Z_WH__WH_TRANSFORMING → ROLE.Z_BASE__ANALYST
+ CREATE: ROLE.Z_BASE__ANALYST → ROLE.ANALYST
+ CREATE: ROLE.Z_TABLES_VIEWS__SELECT__ANALYTICS → ROLE.Z_BASE__ANALYST
+ CREATE: ROLE.ANALYST → USER.FMERCADO
+ CREATE: ROLE.Z_SCHEMAS__USAGE__ANALYTICS → ROLE.Z_BASE__ANALYST
Twenty-one objects from a config that fits on one screen. Grants and role grants each count individually, which is why the number climbs: 6 roles, 9 grants, 6 role grants. The ROLE_GRANTS block is the hierarchy rendered as a list of edges, and reading it bottom to top gives you the whole chain, from the four object roles into Z_BASE__ANALYST, into ANALYST, into USER.FMERCADO.
Two details in that output worth understanding.
The owner is USERADMIN, not SECURITYADMIN. SECURITYADMIN inherits USERADMIN, and role creation lands with the lower privileged of the two. That’s Snowflake’s behavior, not a Snowcap quirk.
ALL grants always show as new. Snowcap flags this in the plan itself:
Actions found in plan that should be reviewed:
- Grants of type ALL found. They will be always recreated since Snowcap does not compare the affected objects.
Snowflake expands all tables in database analytics into individual object grants, so Snowcap can’t diff it against a single stored grant. It reissues it every run. The operation is idempotent and safe, but it does mean ALL grants will never show as clean in a plan. Don’t chase it.
Read the rest of the plan carefully. If it shows something you didn’t expect, or a drop you didn’t ask for, stop and check the config before applying. This matters more with roles and grants than with warehouses, because a wrong grant is a security problem, not just a cost one.
When the plan looks right:
snowcap apply --config snowcap.ymlSnowcap re-runs the comparison, generates the SQL, and executes it. Six roles created, the grants in place, the chain assembled, and fmercado holding the ANALYST role.
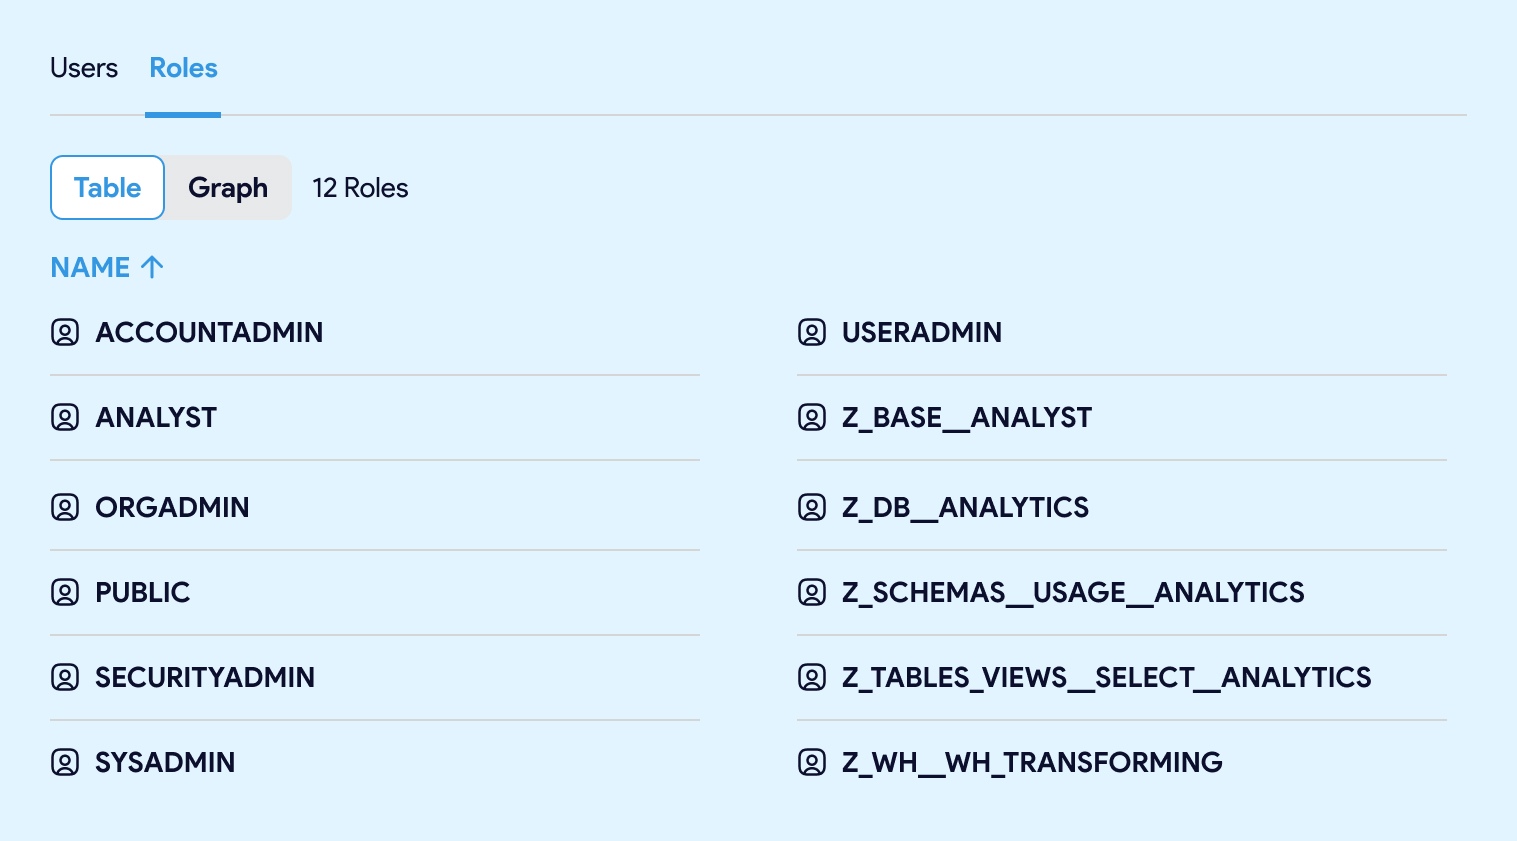
Verify in the Snowflake UI under Governance & security → Users & roles, then open the Roles tab. The z_ prefix sorts the object roles together at the bottom of the list, exactly as intended. Click into ANALYST and you’ll see Z_BASE__ANALYST granted to it; click into Z_BASE__ANALYST and you’ll see the four object roles underneath. Switch to the Users tab and fmercado now has analyst assigned.
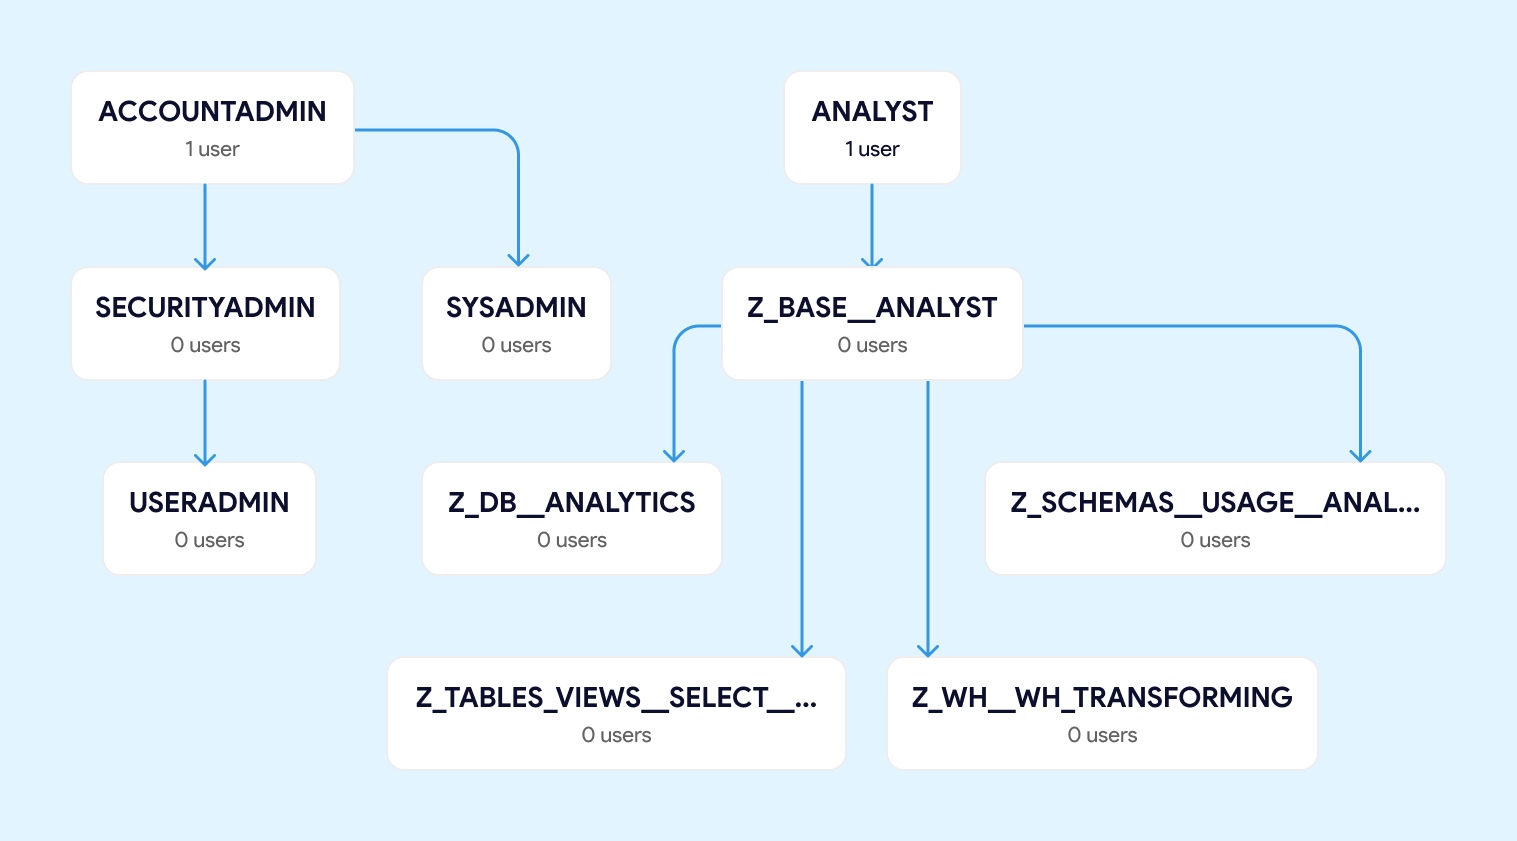
Switch from Table to Graph and Snowflake draws the hierarchy for you: ANALYST on top with one user, Z_BASE__ANALYST beneath it, and the four object roles fanning out at the bottom. It sits as its own branch, separate from the ACCOUNTADMIN tree. That separation is what least privilege looks like when you can actually see it. The YAML you wrote and the picture Snowflake draws are the same shape.
From a worksheet, the same check:
SHOW GRANTS TO USER fmercado;
SHOW GRANTS TO ROLE analyst;
What’s in Snowflake matches what’s declared in the YAML. That’s the whole idea.
One File to Learn, Multiple Files for Production
The single snowcap.yml above is a teaching device. It keeps the whole chain visible while you’re learning the pattern. Past that, it stops being a good idea, because every role, grant, and user assignment in your account ends up in one file that everyone edits at once.
The Snowcap docs recommend splitting the config by concern:
snowcap/
├── resources/
│   ├── databases.yml       	# Database variables
│   ├── schemas.yml         	# Schema variables
│   ├── warehouses.yml      	# Warehouse variables
│   ├── stages.yml          	# Stage definitions + roles + grants
│   ├── roles__base.yml     	# Object-level roles + grants
│   ├── roles__functional.yml   # Functional roles + role hierarchy
│   ├── users.yml           	# User-to-role assignments
│   └── object_templates/
│   	├── database.yml
│   	├── schema.yml
│   	└── warehouses.yml
├── plan.sh
├── apply.sh
└── .env.sample
The snowcap/ folder is the project root: it holds your .env.sample and the wrapper scripts. The config Snowcap reads lives in resources/, and you point at that directory rather than at any individual file:
snowcap plan --config resources/ In practice you wrap that in a script, which is what plan.sh and apply.sh at the project root are for. They load the .env file and call Snowcap with the same flags every time, so nobody on the team runs a slightly different command:
#!/bin/bash
if [ -f .env ]; then
    export $(cat .env | xargs)
else
    echo "File .env does not exist."
    exit 1
fi

uvx snowcap plan \
    --config resources/ \
    --sync_resources role,grant,role_grant
A word on that --sync_resources flag, since it appears in the docs’ example scripts: it turns on full reconciliation for the listed resource types, meaning any role, grant, or role grant in Snowflake that isn’t in your config gets deleted. That’s the right behavior once your config is the true source of truth. It is emphatically not the right behavior on an existing account you haven’t fully captured yet. Leave it off until your plan output comes back clean.
The split does three things a single file can’t.
It makes pull requests readable. A change to users.yml is an access request. A change to roles__base.yml is a change to what a role can reach. Those deserve different levels of scrutiny, and separating them means a reviewer can tell which one they’re looking at from the diff alone.
It matches how the work actually divides. Onboarding a new hire touches users.yml and nothing else. Adding a database touches the database variables and the templates. Different people, different cadence, different files.
It unlocks templates. Once databases are defined as a list in databases.yml, the object_templates/ files use for_each to generate a role and a grant for every entry automatically. Add a database to the list, and its object role appears without you writing another block. That’s the mechanism that turns the pattern from something you maintain by hand into something that maintains itself. The RBAC guide has the full template examples.
Start with one file to learn the shape, then split it early, well before it becomes the file everyone edits at once. The break points above are a good default from your second config onward.
Where This Pays Off: Onboarding, Offboarding, and Scale
Six roles for one analyst looks like a lot of ceremony. The return comes later, on the changes you make every week.
Onboarding is one line. A new analyst starts Monday. Add them under to_user and apply:
role_grants:
  - to_user: fmercado
    roles:
      - analyst

  - to_user: jsmith
    roles:
      - analyst
They inherit the database, the warehouse, the schemas, and every table and view through the chain. Nothing to look up, nothing to copy from a teammate’s account, no chance of granting them something extra by accident.
Offboarding is one deletion. Remove the line and run apply. For the removal to actually revoke the grant rather than just stop tracking it, apply with --sync_resources covering the relevant type (role_grant for a user’s role assignment). Snowcap then deletes what’s no longer in your config, and the Git commit records who removed it and when. Compare that to hunting through the UI hoping you caught every grant. This is also why --sync_resources belongs in your apply.sh once your config is the source of truth: without it, deletions are silently ignored, which is the last thing you want when the deletion is someone’s access.
A new database is one object role. Add z_db__marketing, grant USAGE on the database to it, and plug it into z_base__analyst. The functional roles don’t change. The user assignments don’t change. Every analyst picks it up through the hierarchy on the next apply.
A new team is a new composite role. When analysts and marketing analysts need overlapping but not identical access, build a second composite role from the object roles that already exist and point a new functional role at it. The object roles get reused rather than duplicated, which is exactly why they’re one-object-per-role in the first place.
The pattern also survives the questions that are hard to answer any other way. When compliance asks who can read a table, the answer is in the repo: find the object role that grants SELECT on it, follow the role grants up to the functional roles, and look at who holds them. When someone asks why a grant exists, git log has the pull request that added it.
When compliance asks who can read a table, the answer is in the repo: find the object role that grants SELECT on it, follow the role grants up to the functional roles, and see who holds them.
None of this requires the hierarchy to be elaborate. It requires it to be consistent.
Going Further with Snowcap
This walkthrough covered one functional role in one database. Three things are worth knowing about before you take the pattern to a real account.
Managed access schemas. By default in Snowflake, whoever owns an object can grant privileges on it. An analyst creates a view, and they can hand out SELECT on it to anyone, entirely outside your role hierarchy. Setting managed_access: true on a schema moves that authority to the schema owner, so ad-hoc grants stop being possible and everything routes through the roles you declared. If you’re building RBAC as code for governance reasons, this is the setting that makes the governance actually hold. Snowflake’s access control configuration guide covers the behavior in detail.
Account-level roles vs database roles. Everything here used account-level roles, which is the right default: they work across databases, they can be granted straight to users, and there’s one inheritance tree to reason about. Database roles are scoped to a single database and can’t be granted to users directly, but they’re included in clones and they can be added to shares, which account roles cannot. Reach for them when you’re sharing data externally or when a database owner needs to manage access on their own.
Starting from an existing account. Almost nobody with a two-year-old Snowflake account writes their RBAC config from scratch. snowcap export generates YAML from what’s already there, which gives you a real starting point and an honest picture of how many grants have accumulated.
The RBAC guide covers the first two in depth, including the design reasoning behind each recommendation. Masking policies and row access policies get their own pages, and both compose with the role hierarchy you just built.
The Snowcap workshop covers the role hierarchy pattern in video form.
The analyst role we built isn’t impressive on its own. What matters is that it’s now a thing you can review, revert, and explain, which is more than most Snowflake accounts can say about their permissions. Add the next role, split the file when a second person needs to edit it, and put plan in front of every merge.
Snowcap is open source and lives at snowcap.datacoves.com/ If a resource type is missing or something behaves unexpectedly, GitHub issues are the right place.
Datacoves customers are already running Snowcap against their Snowflake accounts. If you want the same declarative, governed approach applied to dbt and Airflow, running in your own cloud, that’s what the Datacoves platform is built for. Book a free architecture review if you’d like to talk through your setup. For the wider argument on why a warehouse alone isn’t a platform, see What a Snowflake Implementation Actually Requires.