To install Snowcap, you need Python 3.10 or higher. Create a virtual environment, run pip install snowcap, set your Snowflake credentials in a .env file, define a resource in YAML, then run snowcap plan to preview the change and snowcap apply to deploy it. The whole loop takes about five minutes.
This post walks through that loop end to end: install Snowcap on a Mac, declare a Snowflake warehouse in four lines of YAML, and deploy it to a real account. If you'd rather watch than read, the companion video below covers the same ground.
If you're new to Snowcap, start with Introducing Snowcap: Snowflake Infrastructure as Code, Done Right. This post assumes you've read it and want to try out the tool.
What You'll Need Before You Start
Three things, all quick to check.
Python 3.10 or higher. On macOS and Linux, the system Python is usually invoked as python3. Check it:
python3 --version If you see anything below 3.10, install a newer Python before continuing. On Windows, the command is python --version.
A Snowflake account you can experiment in. Snowcap can create, modify, and drop resources across your entire account, so use a sandbox or development account for this walkthrough. Don't point your first run at production.
A role with the right permissions. For creating a warehouse, SYSADMIN is enough. If you plan to manage roles, users, or grants later, you'll want SECURITYADMIN or a dedicated deployment role. The Snowcap docs cover Snowflake permissions for CI/CD service accounts in more detail.
That's it. No state backend to provision, no cloud credentials beyond Snowflake itself.
Run with uv (Recommended)
If you have uv installed, you can run Snowcap directly without installing it. uvx is uv's tool runner: it fetches Snowcap into an isolated cache and executes it without touching your project's Python environment.
uvx snowcap --helpIf you see the available commands listed, you're set. Skip the next section and continue to Step 2.
The rest of this walkthrough shows commands as snowcap plan and snowcap apply. If you're using uvx, prefix each one: uvx snowcap plan ..., uvx snowcap apply ....
Don't have uv yet? Install it with the official one-liner, or use the pip install snowcap path below.
Step 1: Install Snowcap
This section covers the standard pip install path. If you're using uv, skip this section and continue to Step 2.
Create a clean folder for the project and a virtual environment so Snowcap stays isolated from anything else on your machine.
macOS / Linux:
mkdir snowcap-demo && cd snowcap-demo
python3 -m venv .venv
source .venv/bin/activate
pip install snowcap
Windows:
mkdir snowcap-demo && cd snowcap-demo
python -m venv .venv
.\.venv\Scripts\activate
pip install snowcap
When the install finishes, your prompt should show the .venv prefix. Confirm Snowcap is on the path:
snowcap --help You should see the five available commands: apply, connect, export, generate, and plan. If you do, you're ready for the next step.
Step 2: Define a Warehouse in YAML
Snowcap is declarative. Instead of writing a CREATE WAREHOUSE statement, you describe the warehouse you want and let Snowcap figure out the SQL.
Create a file called snowcap.yml in the project folder:
# snowcap.yml
warehouses:
  - name: analytics_demo
    warehouse_size: xsmall
    auto_suspend: 60
That's the whole config. Three properties, no SQL:
name: the warehouse name in Snowflake.warehouse_size: extra-small is plenty for testing.-
auto_suspend: pause the warehouse after 60 seconds of inactivity so you don't burn credits.
No CREATE WAREHOUSE statement. No clicking through the Snowflake UI. Just a declaration of what you want.
This is the part that scales. The same pattern works for one warehouse or a hundred, and the same file structure extends to databases, schemas, roles, grants, masking policies, and the rest of Snowcap's 60+ resource types. For now, one warehouse is enough to see the loop run.
Step 3: Set Up Your Snowflake Credentials
Snowcap reads Snowflake credentials from environment variables. The recommended pattern is a .env file in your project folder.
Create a file called .env:
#.env
SNOWFLAKE_ACCOUNT=my-account
SNOWFLAKE_USER=my-user
SNOWFLAKE_PASSWORD=my-password
SNOWFLAKE_ROLE=SYSADMIN
Replace each value with your own. SNOWFLAKE_ACCOUNT is your Snowflake account identifier. The format depends on whether your account uses the organization-and-account-name pattern, the legacy account locator, or a regional/cloud-specific variant. Snowflake's account identifiers documentation covers the full set of formats and how to find the right one for your account.
Add .env to your .gitignore immediately. If you're using Git, this file should never be committed.
echo .env >> .gitignore Then load the variables into your shell so Snowcap can read them.
macOS / Linux:
export $(cat .env | xargs) Windows (PowerShell):
Get-Content .env | ForEach-Object {
	$name, $value = $_.split('=')
	Set-Item -Path "env:$name" -Value $value
}
Windows (Command Prompt):
for /f "tokens=*" %i in (.env) do set %i That's all the setup. Snowcap will use these credentials for every plan and apply you run in this terminal session.
Authentication Options for Production
Password authentication is fine for a first test on a sandbox account. For anything past that, switch to a method that doesn't put a long-lived password in a file.
Snowcap supports the full set of Snowflake authentication methods:
Key-pair authentication is the right default for production deployments. Point SNOWFLAKE_PRIVATE_KEY_PATH at your .pem file, set the authenticator, and Snowcap handles the rest. Full details are in the Snowcap Getting Started guide and the Snowflake key-pair auth docs.
Step 4: Preview Changes with snowcap plan
Before changing anything in Snowflake, run plan. This is the dry run.
snowcap plan --config snowcap.yml Snowcap connects to your Snowflake account, queries the current state (what warehouses exist, what roles, what grants), compares it to your config, and prints exactly what it would do.
For our four-line config, the output ends with a plan summary like this:
» snowcap
» Plan: 1 to create, 0 to update, 0 to transfer, 0 to drop.

━━━ WAREHOUSES ━━━━━━━━━━━━━━━━━━━━━━━━━━━━━━━━━━━
+ CREATE: ANALYTICS_DEMO (owner: SYSADMIN, size: XSMALL)
One to create. Nothing else touched. Above the summary, Snowcap also prints the introspection queries it ran (SHOW WAREHOUSES IN ACCOUNT, SHOW ROLES IN ACCOUNT, and a few others), so you can see exactly how it built its picture of the account.
This is the safety check, and it's the reason a declarative tool beats hand-written SQL: you always know what's going to happen before it happens. If the output shows more changes than you expected, stop and check your config. Don't assume the tool is wrong.
Always run snowcap plan before snowcap apply, especially on a shared account.
Step 5: Deploy with snowcap apply
When the plan looks right, apply it.
snowcap apply --config snowcap.yml Snowcap re-runs the comparison, generates the SQL, and executes it against your account. For the warehouse config above, the output finishes with:
» snowcap
» Plan: 1 to create, 0 to update, 0 to transfer, 0 to drop.

━━━ WAREHOUSES ━━━━━━━━━━━━━━━━━━━━━━━━━━━━━━━━━━
+ CREATE: ANALYTICS_DEMO (owner: SYSADMIN, size: XSMALL)


» Applied: 1 created, 0 updated, 0 transferred, 0 dropped.
That's the loop. Declare, plan, apply. The same three commands work whether you're creating one warehouse or deploying a full role hierarchy across forty databases.
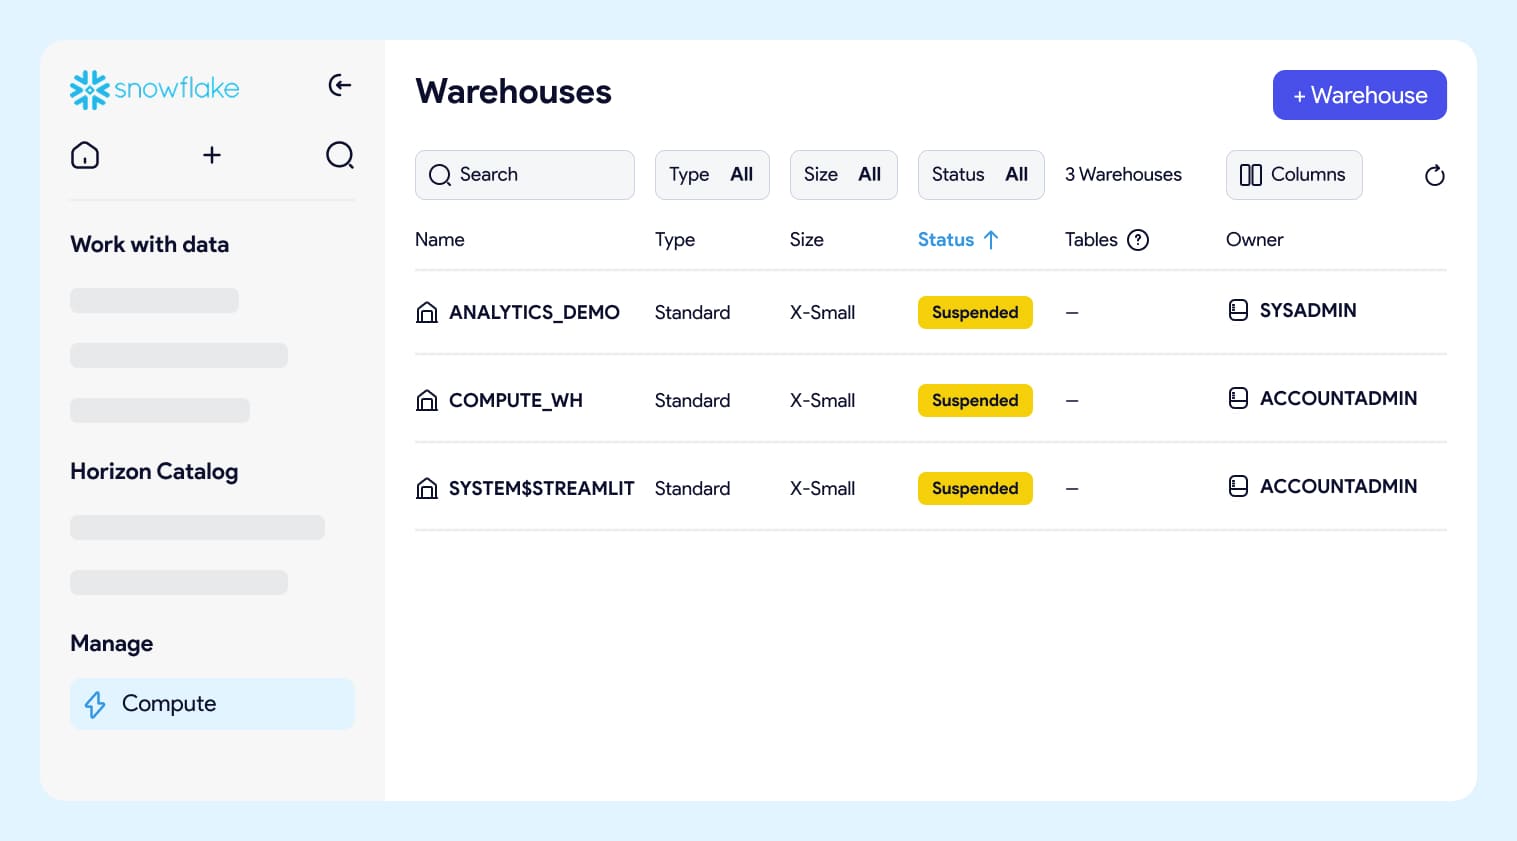
Verify the Warehouse in Snowflake
Switch over to the Snowflake UI and open Compute → Warehouses. You should see ANALYTICS_DEMO in the list, sized X-Small, owned by SYSADMIN. Status could show as Suspended, which is correct: auto-suspend is set to 60 seconds and the warehouse hasn't run a query yet.
If you'd rather verify from a SQL worksheet:
SHOW WAREHOUSES LIKE 'ANALYTICS_DEMO'; That's the full loop. You declared a warehouse, previewed the change, applied it, and confirmed the result.
Add More Warehouses
The same snowcap.yml scales without restructuring. To create four more warehouses, just add them to the existing warehouses list:
# snowcap.yml
warehouses:
  - name: analytics_demo
    warehouse_size: xsmall
    auto_suspend: 60
  - name: loader_demo
    warehouse_size: xsmall
    auto_suspend: 60
  - name: transformer_demo
    warehouse_size: small
    auto_suspend: 120
  - name: reporting_demo
    warehouse_size: small
    auto_suspend: 300
  - name: ad_hoc_demo
    warehouse_size: xsmall
    auto_suspend: 60
Run snowcap plan --config snowcap.yml again. This time the output shows four to create and one to leave alone, because analytics_demo already matches what's declared:
» snowcap
» Plan: 4 to create, 0 to update, 0 to transfer, 0 to drop.

━━━ WAREHOUSES ━━━━━━━━━━━━━━━━━━━━━━━━━━━━━━━━━━━
+ CREATE: LOADER_DEMO (owner: SYSADMIN, size: XSMALL)
+ CREATE: TRANSFORMER_DEMO (owner: SYSADMIN, size: SMALL)
+ CREATE: REPORTING_DEMO (owner: SYSADMIN, size: SMALL)
+ CREATE: AD_HOC_DEMO (owner: SYSADMIN, size: XSMALL)
Run snowcap apply --config snowcap.yml to deploy them. The same two commands handle one resource or a hundred.
What plan and apply Actually Do
Understanding what's happening under the hood is what separates running Snowcap from running a one-off script.
snowcap plan connects to your Snowflake account, runs a series of introspection queries (SHOW WAREHOUSES IN ACCOUNT, SHOW ROLES IN ACCOUNT, SHOW GRANTS ON ACCOUNT, and others), and builds a live picture of what exists. It compares that picture to your YAML config and reports the difference. Nothing is written. No SQL is executed against your objects.
snowcap apply does the same comparison, then generates and runs the SQL needed to make Snowflake match the config. If a warehouse needs to be created, it issues CREATE WAREHOUSE. If a property needs to change, it issues ALTER. Snowcap will only drop resources when you explicitly opt in with --sync_resources (more on that below).
Two things to notice.
No state file. The "state" is whatever Snowflake reports right now. If someone creates a warehouse through the UI, Snowcap sees it on the next plan. There's nothing to reconcile, nothing to corrupt, nothing to lock.
Snowcap doesn't keep a state file. It queries Snowflake directly on every run, compares the live account to your YAML config, and generates the SQL to make them match.
Scoped by default. Snowcap only acts on the resource types you've declared. To enforce full reconciliation for specific types, opt in with the --sync_resources flag, where anything not in config gets deleted. This is powerful and dangerous. Run --sync_resources warehouse against an account that has Snowflake's default COMPUTE_WH, and Snowcap will plan to drop it on the next apply. Always read the plan output line by line before running apply with this flag.
By default, Snowcap only manages what you declare. If a warehouse exists in Snowflake but isn't in your YAML, Snowcap leaves it alone.
The Snowcap CLI reference covers the full set of flags, including scoping options like --exclude, --database, and --schema. If you're starting from an existing account, snowcap export generates config from what's already there so you don't have to write it by hand.
Where to Go Next
You've run the full loop and scaled it across multiple warehouses. The same pattern scales to everything else Snowcap manages.
A few good next moves:
- Mix resource types. Add a database, a schema, and a role to the same
snowcap.yml. Runplanand watch Snowcap order the SQL correctly so dependencies are created in the right sequence.
- Run
snowcap exportagainst an existing account. It generates YAML for what's already there, which is the fastest way to see what a real-world config looks like. Treat the output as a starting point, not a finished product.
- Switch to key-pair authentication. Password auth was fine for this walkthrough. For anything heading toward CI/CD, set up a service user with key-pair auth following the Snowflake permissions guide.
- Move into role-based access control. Roles and grants are where IaC pays off the most, because they're also where manual management hurts the most. The Snowcap RBAC guide covers the recommended pattern.
The Snowcap source and documentation live at snowcap.datacoves.com and github.com/datacoves/snowcap. If you run into something unexpected or want to suggest a resource type, the GitHub issues are the right place.
Snowcap is being used by Datacoves customers, and it's part of how we expanded our Snowflake AI Data Cloud support. If you want the same declarative, governed approach applied to dbt and Airflow, that's what the Datacoves platform is built for.